How to choose an industrial endoscope? Don't pile up parameters, teach you how to fit in according to the scene
Many people choose endoscopes and start by comparing a bunch of parameters, the more they look, the more chaotic they become. Actually, there's no need to be so troublesome. The core is one thing: match your own testing site. Today, let's not talk about the boring parameter table, but step by step explain how to find the one that suits you.
The first thing to consider is the aperture, which is also the first step in selection.
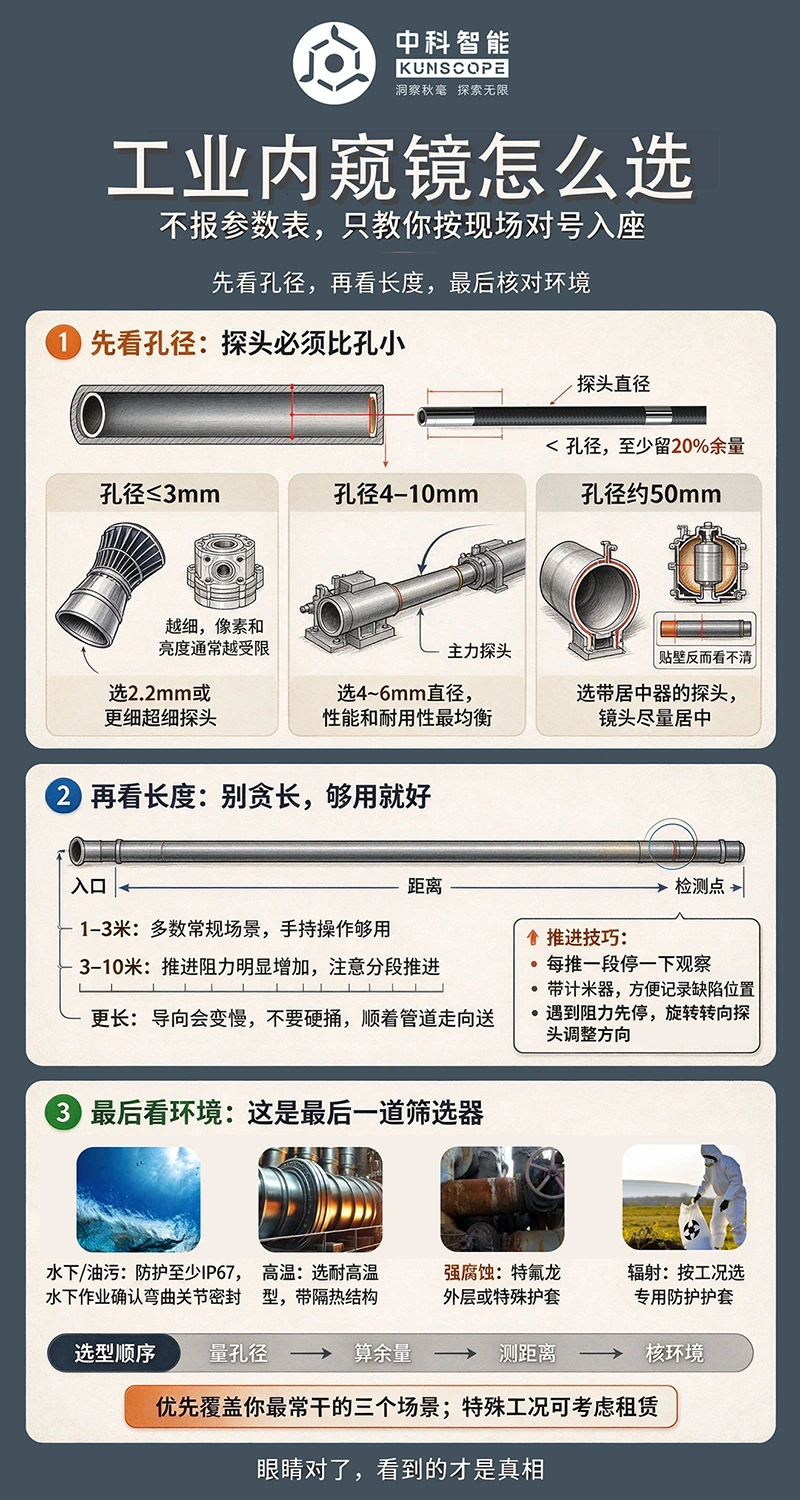
First, measure the diameter of the hole or pipe you want to insert. There is a key point that must be remembered: the probe diameter must be smaller than the hole, leaving at least 20% margin.
If the aperture is ≤ 3 millimeters, for micro hole detection such as aviation engine fuel nozzles and precision mold cooling holes, priority should be given to ultra-fine probes with a diameter of 2.2mm or finer. But it should be mentioned here that the finer the probe is made, the more limited the pixel and lighting brightness will generally be. This requires one to weigh and choose, and there is no win-win option.
The aperture is between 4-10 millimeters, which belongs to the most common and versatile range. Choosing a probe with a diameter of 4mm to 6mm is very suitable, as it has a good balance between performance and durability, and is also a commonly used main model.
If the aperture is around 50 millimeters, such as in large pipelines and pressure vessels, the approach may be different. Don't think that the larger the probe, the better. It's best to pair it with a centralizer to stabilize the lens in the middle of the pipeline. The lens is attached to the pipe wall, which limits the field of view and makes it difficult to see many places clearly.
After determining the aperture, look at the required working length. Measure the distance from the entrance to the location you want to check, don't blindly choose a very long pipeline.
1-3 meters, sufficient for most conventional detection scenarios, and easy to operate handheld.
Attention should be paid to the range of 3-10 meters, as the longer the pipeline, the greater the resistance to propulsion. Long distance light attenuation is an unavoidable problem, usually compensated by high brightness lighting, and the pipeline itself needs to have appropriate rigidity. It is recommended to advance in sections, push one section, stop and observe, and then continue to push inward. Wearing a meter counter will save a lot of effort and accurately record the location of defects.
When advancing a long pipeline, do not forcefully poke it. Slowly follow the direction of the pipeline and stop immediately when encountering resistance. Rotate the probe to adjust the angle and try again. The longer the pipeline, the less flexible the turning, and the turning will become very slow. So don't just be greedy for your strengths when choosing, having enough is the best.
The final step is to verify the on-site working conditions and environment, which is equivalent to the last screening condition.
Underwater, oily scenes with a protection level of at least IP67; If it is a continuous underwater operation, additionally confirm the sealing performance of the curved joint.
For high-temperature working conditions, it is necessary to choose a high-temperature resistant model with insulation structure. A regular probe goes black in just a few seconds and is completely unusable.
In environments with strong corrosion and radiation, it is necessary to use a PTFE outer layer or special protective sheath to protect the inserted pipeline from corrosion damage.
A practical suggestion for everyone: prioritize matching the three types of detection scenarios that you usually do the most. When encountering special working conditions where it can only be used a few times a year, it is not necessary to purchase a new machine. Leasing is also a cost-effective option.
Choosing the right 'eyes' is the key to seeing the truth hidden within.

 CN
 EN


